测试环境
| 节点IP | 节点功能 |
|---|---|
| 192.168.1.10 | mon,osd,rgw |
| 192.168.1.11 | mon,osd,rgw |
| 192.168.1.12 | mon,osd,rgw |
测试准备
1、配置升级Luminous的yum源
# cat ceph-luminous.repo[ceph]name=x86_64baseurl=https://mirrors.aliyun.com/ceph/rpm-luminous/el7/x86_64/gpgcheck=0[ceph-noarch]name=noarchbaseurl=https://mirrors.aliyun.com/ceph/rpm-luminous/el7/noarch/gpgcheck=0[ceph-arrch64]name=arrch64baseurl=https://mirrors.aliyun.com/ceph/rpm-luminous/el7/aarch64/gpgcheck=0[ceph-SRPMS]name=SRPMSbaseurl=https://mirrors.aliyun.com/ceph/rpm-luminous/el7/SRPMS/gpgcheck=0
把生成的yum源文件拷贝到每一个节点上,并删除原本的jewel版yum源
# ansible node -m copy -a 'src=ceph-luminous.repo dest=/etc/yum.repos.d/ceph-luminous.repo'# ansible node -m file -a 'name=/etc/yum.repos.d/ceph-jewel.repo state=absent'
2、设置sortbitwis
如果未设置,升级过程中可能会出现数据丢失的情况
# ceph osd set sortbitwise
3、设置noout
为了防止升级过程中出现数据重平衡,升级完成后取消设置即可
# ceph osd set noout
设置完成后集群状态如下
# ceph -scluster 0d5eced9-8baa-48be-83ef-64a7ef3a8301health HEALTH_WARNnoout flag(s) setmonmap e1: 3 mons at {node1=192.168.1.10:6789/0,node2=192.168.1.11:6789/0,node3=192.168.1.12:6789/0}election epoch 26, quorum 0,1,2 node1,node2,node3osdmap e87: 9 osds: 9 up, 9 inflags noout,sortbitwise,require_jewel_osdspgmap v267: 112 pgs, 7 pools, 3084 bytes data, 173 objects983 MB used, 133 GB / 134 GB avail112 active+clean
4、Luminous版的ceph需要指定允许pool删除的参数,在每个mon节点的ceph配置文件中添加”mon allow pool delete = true”
# ansible node -m shell -a 'echo "mon allow pool delete = true" >> /etc/ceph/ceph.conf'
开始升级
1、确认当前集群中安装的ceph软件包版本
# ansible node -m shell -a 'rpm -qa | grep ceph'[WARNING]: Consider using yum, dnf or zypper module rather than running rpmnode1 | SUCCESS | rc=0 >>ceph-selinux-10.2.11-0.el7.x86_64ceph-10.2.11-0.el7.x86_64ceph-deploy-1.5.39-0.noarchlibcephfs1-10.2.11-0.el7.x86_64python-cephfs-10.2.11-0.el7.x86_64ceph-base-10.2.11-0.el7.x86_64ceph-mon-10.2.11-0.el7.x86_64ceph-osd-10.2.11-0.el7.x86_64ceph-radosgw-10.2.11-0.el7.x86_64ceph-common-10.2.11-0.el7.x86_64ceph-mds-10.2.11-0.el7.x86_64node3 | SUCCESS | rc=0 >>ceph-mon-10.2.11-0.el7.x86_64ceph-radosgw-10.2.11-0.el7.x86_64ceph-common-10.2.11-0.el7.x86_64libcephfs1-10.2.11-0.el7.x86_64python-cephfs-10.2.11-0.el7.x86_64ceph-selinux-10.2.11-0.el7.x86_64ceph-mds-10.2.11-0.el7.x86_64ceph-10.2.11-0.el7.x86_64ceph-base-10.2.11-0.el7.x86_64ceph-osd-10.2.11-0.el7.x86_64node2 | SUCCESS | rc=0 >>ceph-mds-10.2.11-0.el7.x86_64python-cephfs-10.2.11-0.el7.x86_64ceph-base-10.2.11-0.el7.x86_64ceph-mon-10.2.11-0.el7.x86_64ceph-osd-10.2.11-0.el7.x86_64ceph-radosgw-10.2.11-0.el7.x86_64ceph-common-10.2.11-0.el7.x86_64ceph-selinux-10.2.11-0.el7.x86_64ceph-10.2.11-0.el7.x86_64libcephfs1-10.2.11-0.el7.x86_64
2、确认当前集群使用的ceph版本
# ansible node -m shell -a 'for i in `ls /var/run/ceph/ | grep "ceph-mon.*asok"` ; do ceph --admin-daemon /var/run/ceph/$i --version ; done'node1 | SUCCESS | rc=0 >>ceph version 10.2.11 (e4b061b47f07f583c92a050d9e84b1813a35671e)node2 | SUCCESS | rc=0 >>ceph version 10.2.11 (e4b061b47f07f583c92a050d9e84b1813a35671e)node3 | SUCCESS | rc=0 >>ceph version 10.2.11 (e4b061b47f07f583c92a050d9e84b1813a35671e)
3、升级软件包
# ansible node -m yum -a 'name=ceph state=latest'
4、升级完成后,查看当前集群节点中安装的软件包版本
# ansible node -m shell -a 'rpm -qa | grep ceph'[WARNING]: Consider using yum, dnf or zypper module rather than running rpmnode2 | SUCCESS | rc=0 >>ceph-base-12.2.10-0.el7.x86_64ceph-osd-12.2.10-0.el7.x86_64python-cephfs-12.2.10-0.el7.x86_64ceph-common-12.2.10-0.el7.x86_64ceph-selinux-12.2.10-0.el7.x86_64ceph-mon-12.2.10-0.el7.x86_64ceph-mds-12.2.10-0.el7.x86_64ceph-radosgw-12.2.10-0.el7.x86_64libcephfs2-12.2.10-0.el7.x86_64ceph-mgr-12.2.10-0.el7.x86_64ceph-12.2.10-0.el7.x86_64node1 | SUCCESS | rc=0 >>ceph-base-12.2.10-0.el7.x86_64ceph-osd-12.2.10-0.el7.x86_64ceph-deploy-1.5.39-0.noarchpython-cephfs-12.2.10-0.el7.x86_64ceph-common-12.2.10-0.el7.x86_64ceph-selinux-12.2.10-0.el7.x86_64ceph-mon-12.2.10-0.el7.x86_64ceph-mds-12.2.10-0.el7.x86_64ceph-radosgw-12.2.10-0.el7.x86_64libcephfs2-12.2.10-0.el7.x86_64ceph-mgr-12.2.10-0.el7.x86_64ceph-12.2.10-0.el7.x86_64node3 | SUCCESS | rc=0 >>python-cephfs-12.2.10-0.el7.x86_64ceph-common-12.2.10-0.el7.x86_64ceph-mon-12.2.10-0.el7.x86_64ceph-radosgw-12.2.10-0.el7.x86_64libcephfs2-12.2.10-0.el7.x86_64ceph-base-12.2.10-0.el7.x86_64ceph-mgr-12.2.10-0.el7.x86_64ceph-osd-12.2.10-0.el7.x86_64ceph-12.2.10-0.el7.x86_64ceph-selinux-12.2.10-0.el7.x86_64ceph-mds-12.2.10-0.el7.x86_64
5、分别对所有的mon,osd,rgw进程进行重启
node1节点
# systemctl restart ceph-mon@node1# systemctl restart ceph-osd@{0,1,2}# systemctl restart ceph-radosgw@rgw.node1
node2节点
# systemctl restart ceph-mon@node2# systemctl restart ceph-osd@{3,4,5}# systemctl restart ceph-radosgw@rgw.node2
node3节点
# systemctl restart ceph-mon@node3# systemctl restart ceph-osd@{6,7,8}# systemctl restart ceph-radosgw@rgw.node3
6、调整require_osd_release
此时查看集群状态信息如下
# ceph -scluster:id: 0d5eced9-8baa-48be-83ef-64a7ef3a8301health: HEALTH_WARNnoout flag(s) setall OSDs are running luminous or later but require_osd_release < luminousno active mgrservices:mon: 3 daemons, quorum node1,node2,node3mgr: no daemons activeosd: 9 osds: 9 up, 9 inflags nooutdata:pools: 7 pools, 112 pgsobjects: 189 objects, 3.01KiBusage: 986MiB used, 134GiB / 135GiB availpgs: 112 active+clean
需要手动调整require_osd_release
# ceph osd require-osd-release luminous
7、取消noout设置
# ceph osd unset noout
再次查看集群状态如下
# ceph -scluster:id: 0d5eced9-8baa-48be-83ef-64a7ef3a8301health: HEALTH_WARNno active mgrservices:mon: 3 daemons, quorum node1,node2,node3mgr: no daemons activeosd: 9 osds: 9 up, 9 indata:pools: 0 pools, 0 pgsobjects: 0 objects, 0Busage: 0B used, 0B / 0B availpgs:
8、配置mgr
1)生成密钥
# ceph auth get-or-create mgr.node1 mon 'allow *' osd 'allow *'[mgr.node1]key = AQC0IA9c9X31IhAAdQRm3zR5r/nl3b7+WOwZjQ==
2)创建数据目录
# mkdir /var/lib/ceph/mgr/ceph-node1/
3)添加密钥
# ceph auth get mgr.node1 -o /var/lib/ceph/mgr/ceph-node1/keyringexported keyring for mgr.node1
4)设置服务开机自启
# systemctl enable ceph-mgr@node1Created symlink from /etc/systemd/system/ceph-mgr.target.wants/ceph-mgr@node1.service to /usr/lib/systemd/system/ceph-mgr@.service.
5)启动mgr
# systemctl start ceph-mgr@node1
6)其他mon节点通过同样的方式配置一下mgr,再次查看集群状态
# ceph -scluster:id: 0d5eced9-8baa-48be-83ef-64a7ef3a8301health: HEALTH_OKservices:mon: 3 daemons, quorum node1,node2,node3mgr: node1(active), standbys: node2, node3osd: 9 osds: 9 up, 9 inrgw: 3 daemons activedata:pools: 7 pools, 112 pgsobjects: 189 objects, 3.01KiBusage: 986MiB used, 134GiB / 135GiB availpgs: 112 active+clean
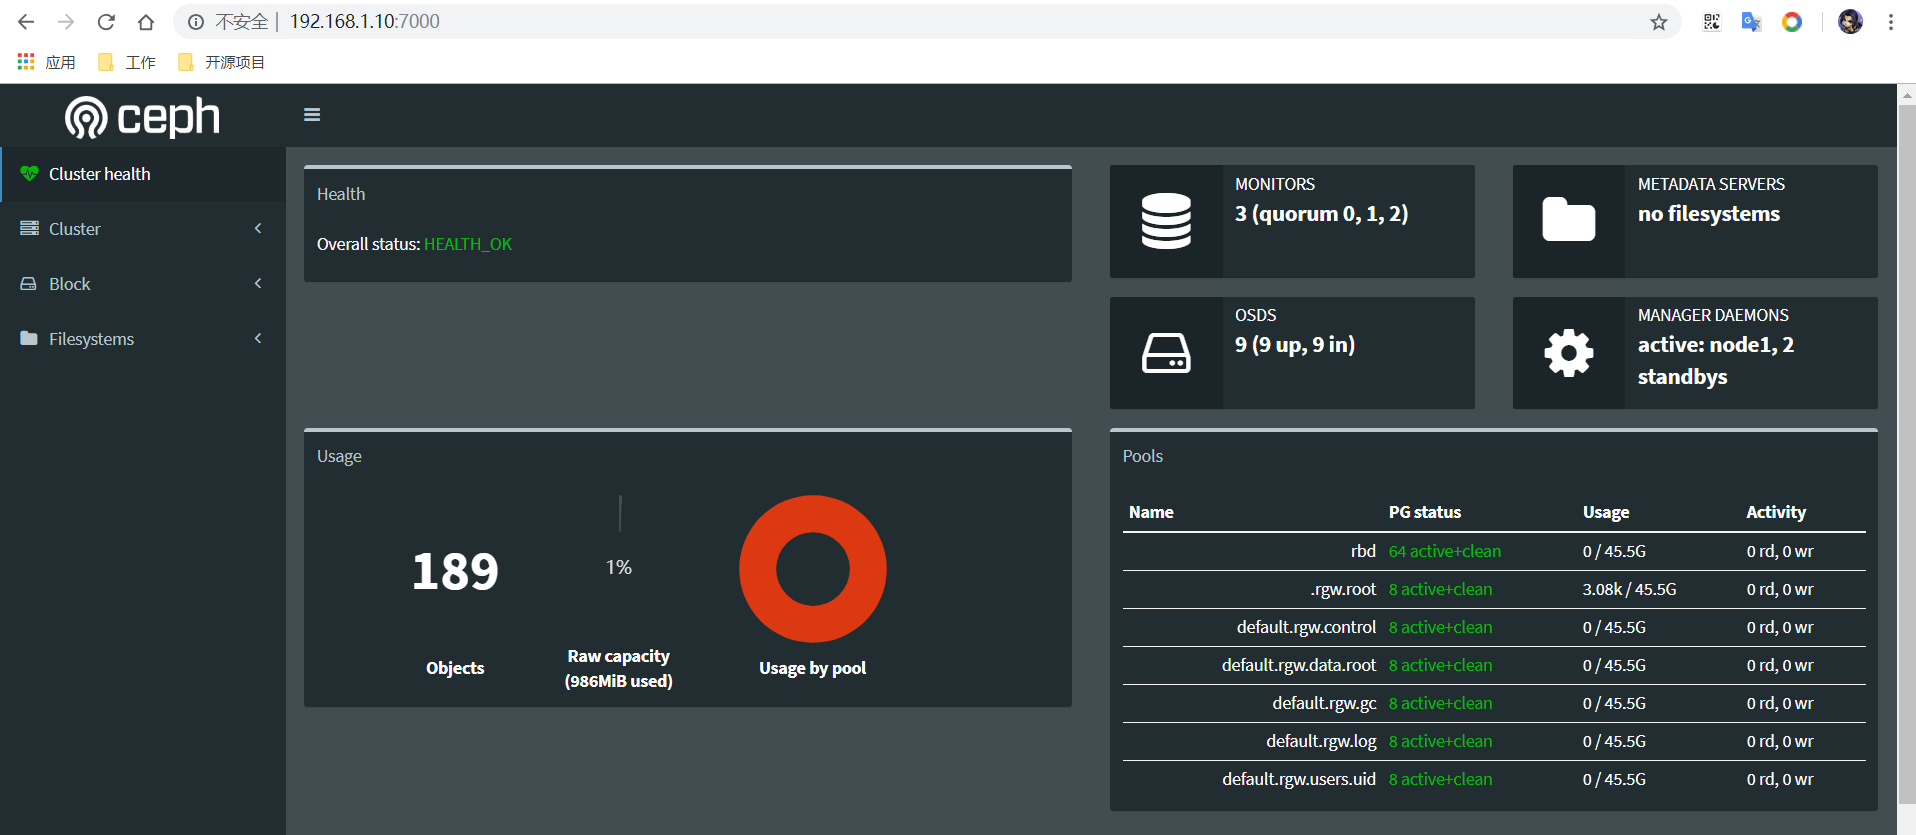
7)开启mgr的dashboard模块,dashboard提供一个web界面可以对集群状态进行监控
# ceph mgr module enable dashboard# ceph mgr module ls{"enabled_modules": ["balancer","dashboard","restful","status"],"disabled_modules": ["influx","localpool","prometheus","selftest","zabbix"]}# ceph mgr services{"dashboard": "http://node1:7000/"}
8)访问dashboard
使用deploy升级集群
如果集群是使用的deploy部署,也可以通过deploy进行升级,软件包的升级命令如下,其他的操作步骤都是类似的,这里不再赘述。
# ceph-deploy install --release lumious node1 node2 node3# ceph-deploy --overwrite-conf mgr create node1 node2 node3
